
What is .Net Core?

What is .Net?

Well it is a question asked very frequently that what exactly is .Net and how can I get started with it. So let’s get to the answer real quick.
.Net is a legacy framework of Microsoft initially build to make Windows Apps only. Though as the time changed, it evolved into something more agile and smooth, what we say it as .NET Core, which consists of the core set of libraries from the Legacy .Net Framework.
.NET Core is technically a framework, can also be said to be a platform where one can make various kinds of Applications. Be it Windows Apps, Linux Apps, Web based Apps, Mobile Apps, IoT Apps, etc. It is a one stop solution to all the tech stacks. It is now call
And you know what’s best about the new .Net Core?
  • It is Free to use
  • It is Open Source
  • Cross- Platform
  • Supports multiple Languages
  • Can be used to make various kind of apps
  • Made with Love by Microsoft

Why should I Use it?

According to Microsoft .Net (here) has significantly outrun the other competitors in terms of Performance. As in a survey done few years back, it was found that .Net got the score of 6.7Million requests/ seconds, meaning it was able to accept such huge amount of load.
On the other hand the competitors were at 2.55M/sec, 0.83M/sec and so…
As we all know that in terms of security Microsoft is one of those companies which we can trust upon. The .Net Core also receives very stable and efficient updates for better production.
So now let’s see that how to get started with .Net Core…
  1. Download the .Net Core SDK to run & develop Apps based on .Net Core.
  2. Let’s get started by checking our system for successful install of .Net Core.
  3. Open Command Prompt/ Bash/ Terminal and then type in the below command (without quotes):
    “dotnet –version”
  4. If it shows up some numbers separated by period, then you’re good to go with the next steps. Else there is some problem with the installation or the path variable in the system.
  5. On the command prompt, type the below command to create a new Console type Application:
    1. dotnet new console –o myApp
    2. cd myApp
  6. The above command has a parameter which says –o, it is used here to create a new directory named: myApp. “Console” specifies the type of app.
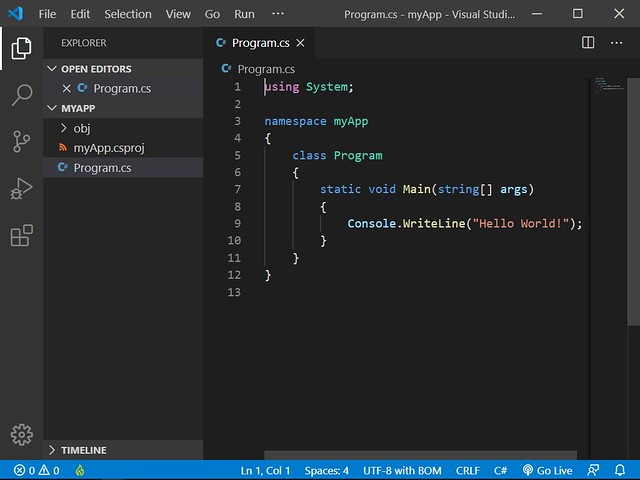
  7. Here the project is created, after opening the folder, we can see that there is a file named as “program.cs”, it is the main code file where our program logic will live.
  8. Now let’s run this sample program just created by the below command:
    “dotnet run”
  9. Now add the below line after the Hello World statement:
    Console.WriteLine("The current time is " + DateTime.Now);
  10. Now again run the command: “dotnet run”
This is how to create a simple.Net Core Console Application.
Thank you for time by reading this article.

Comments

Popular posts from this blog

Creating a URL Shortener Deplyment on Azure (NodeJS) part-2

For reference to the previous post, please refer to this link : Connecting-to-our-Database Now let's head to the package that we added config in the npm install command, what it does is that it will look for default.json the file inside config (folder) which we created earlier that will consist of the global variables for our project. Now let's open that default.json file and place the below snippet in it: { "mongoURI": "<ConnectionStringHere>" } We'll replace the Connection String from the cluster's string from our Atlas Account (if you still don't have an account, click here to create one) After Logging in to the Atlas, create a free Cluster and add a database user in it Now use the below code in the db.js the file inside the config (folder): const mongoose = require('mongoose'); const config = require('config'); // Grab the Connection string URL from the default.json file const db = confi
Post-Event Resources- Ai Gaming with Microsoft Azure Heya  Folks hope you enjoyed the Event, do let us know in the comment section about your experience. As said, Here are the Post Event Resources for your continual Learning... Basic Concept of Ai (Theory) AI in Video Games: Toward a More Intelligent Game What is an API Open-Ai 5 Article Microsoft Cognitive- Getting started with Azure Cognitive Services Bundled Playlist on Youtube Microsoft Cognitive Vision Service- Try for Free online Some Videos by Siraj:  OpenAI Five vs Dota 2 Explained How to Install OpenAI's Universe and Make a Game Bot    How to Make an Amazing Video Game Bot Easily Hope you find the Resources resources... For folks interested in Microsoft Azure ML, Click Here

Signing Up for Azure 4 Students Account

Sign-Up: Microsoft Azure 4 Students Hola readers, In this post we're gonna learn how to create a new Microsoft Azure Account for Students. As a typical Azure account requires you to provide with the Credit Card details but due to the fact that not all the students around the globe have credit cards. So Microsoft have a provision for granting Azure Credits to students by the help of their Educational Account provided by their School/ Universities. Here are the steps provided to create a new Azure4Students Account (Though a video is also available to follow along): Text version of the SigningUp Process Visit: aka.ms/Azure4Students Sign in with your Microsoft Account or create a Microsoft Account if you don't have one After successfully logging in, enter your Country code & mobile number. Then click on the Verification options (Text/ Call) for your Identity verification. Next comes the Student Verification. This can be done by either: Providing your scho
Counter Widget