
Hands-On ASP .NET Core WebApp

Here come the most awaited article on how to get started with the Hands- On with the ASP .NET Core via Visual Studio Code (VS Code: Text Editor) and a command line prompt.

So if you’re new to the ASP .Net Core, then do have a look at this article. Though the Command line terminal is integrated inside VS Code, still we’ll use MS Command prompt. In the later articles we’ll use the integrated VSCode Interface to interact with the Terminal

So to get started with ASP .NET Core:

  1. Open the Command prompt on windows or Terminal on Linux or bash on Mac accordingly.
  2. Navigate to the directory where we want to create our first Web App.
  3. Run the following command (without “” quotes):
    1. “dotnet new webApp -o myWebApp --no-https”
    2. “cd myWebApp”
  1. Now that we’ve run the above commands we can see that a folder is created in the name of “myWebApp” and it has a basic sample Web Application of the Application.
  2. Now let’s run the application by using the Command Line, and see what’s inside of the Application.
  3. Run the following command in the command line (make sure to run the below command after navigating inside the project directory in the console):
    1. “dotnet run”
  1. Now open the browser and type “localhost:5000” in the browser (or the url mentioned in the output of the above command)
  2. You’ll notice that the website by default supports the responsiveness for the navigation bar. It is due to the Bootstrap framework it is using.
  3. To stop the website from running state, simply press “ctrl+c”.
  4. Now do some tweaks in the website, like add a Welcome message. Switch to the VS Code and open the project folder in it.
  5. Now open the file named “Index.cshtml” present in the Folder “Pages”
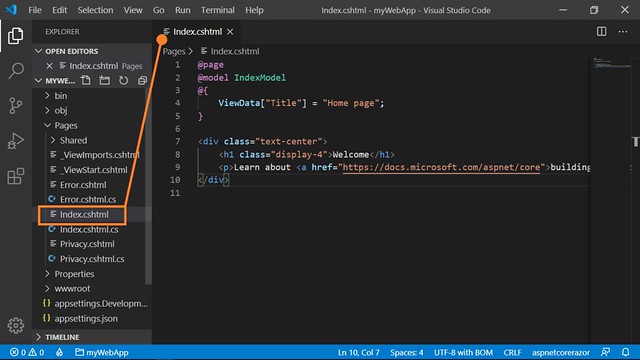
  6. Now let’s change some HTML inside the <H1> tag and the <p> tag:
    1. Content inside the <H1> tag: Welcome to my First Demo on ASP .NET Core Web Apps
    2. Content inside the <p> tag: Hi, this is a sample website generated from the “dotnet new webApp -o myWebApp --no-https” command
  1. Now let’s run the application by “dotnet run” again.
Thank you so for your time and efforts. Stay tuned, exciting stuff on the way. 😃

Comments

Popular posts from this blog

Creating a URL Shortener Deplyment on Azure (NodeJS) part-2

For reference to the previous post, please refer to this link : Connecting-to-our-Database Now let's head to the package that we added config in the npm install command, what it does is that it will look for default.json the file inside config (folder) which we created earlier that will consist of the global variables for our project. Now let's open that default.json file and place the below snippet in it: { "mongoURI": "<ConnectionStringHere>" } We'll replace the Connection String from the cluster's string from our Atlas Account (if you still don't have an account, click here to create one) After Logging in to the Atlas, create a free Cluster and add a database user in it Now use the below code in the db.js the file inside the config (folder): const mongoose = require('mongoose'); const config = require('config'); // Grab the Connection string URL from the default.json file const db = confi
Post-Event Resources- Ai Gaming with Microsoft Azure Heya  Folks hope you enjoyed the Event, do let us know in the comment section about your experience. As said, Here are the Post Event Resources for your continual Learning... Basic Concept of Ai (Theory) AI in Video Games: Toward a More Intelligent Game What is an API Open-Ai 5 Article Microsoft Cognitive- Getting started with Azure Cognitive Services Bundled Playlist on Youtube Microsoft Cognitive Vision Service- Try for Free online Some Videos by Siraj:  OpenAI Five vs Dota 2 Explained How to Install OpenAI's Universe and Make a Game Bot    How to Make an Amazing Video Game Bot Easily Hope you find the Resources resources... For folks interested in Microsoft Azure ML, Click Here

Signing Up for Azure 4 Students Account

Sign-Up: Microsoft Azure 4 Students Hola readers, In this post we're gonna learn how to create a new Microsoft Azure Account for Students. As a typical Azure account requires you to provide with the Credit Card details but due to the fact that not all the students around the globe have credit cards. So Microsoft have a provision for granting Azure Credits to students by the help of their Educational Account provided by their School/ Universities. Here are the steps provided to create a new Azure4Students Account (Though a video is also available to follow along): Text version of the SigningUp Process Visit: aka.ms/Azure4Students Sign in with your Microsoft Account or create a Microsoft Account if you don't have one After successfully logging in, enter your Country code & mobile number. Then click on the Verification options (Text/ Call) for your Identity verification. Next comes the Student Verification. This can be done by either: Providing your scho
Counter Widget